


OEM Tools 24364 Double Flaring Tool & Brake Line Kit
Our 24364 double flaring tool kit delivers professional-quality brake line work for DIY mechanics and shop technicians. This comprehensive inline flaring system creates precise 45-degree double flares and bubble flares on 3/16-inch and 1/4-inch steel brake lines without splitting or deforming the tubing.
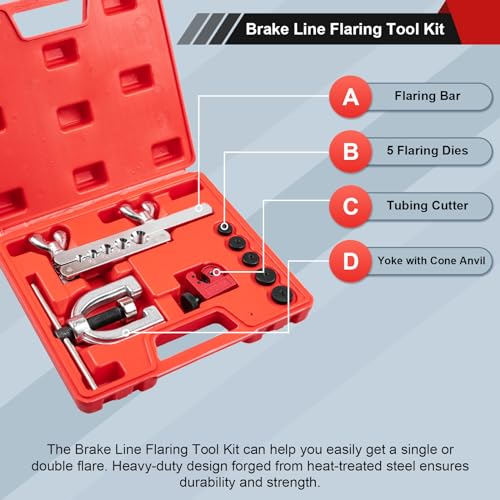
The kit includes a heavy-duty flaring bar with hardened steel dies, a yoke-style flaring cone assembly, an integrated tube cutter, and a spring-loaded bending tool. Every component is designed for repeated use on vehicles ranging from compact cars to light trucks. The click-stop adjuster on the flaring cone ensures consistent flare depth across multiple lines, eliminating guesswork and comebacks.
We built the 24364 for techs who need portable, reliable brake line fabrication without the bulk of stationary bench tools. The protective carrying case keeps all components organized and ready for mobile service calls or cramped shop spaces.
- Creates 45° double flares and bubble flares on 3/16" and 1/4" steel brake lines
- Hardened steel dies and yoke assembly resist wear through hundreds of flares
- Integrated tube cutter with replaceable cutting wheel for clean, square cuts
- Spring-loaded bending tool forms smooth, kink-free 90° and 180° bends
- Click-stop depth adjuster ensures uniform flare seat depth
How the double flaring process works
The OEM automotive tools inline flaring tools 24364 uses a two-stage process to form the industry-standard 45-degree double flare required on most hydraulic brake systems. After cutting the tubing square with the included cutter, you clamp the line in the flaring bar so exactly 3/8 inch protrudes above the die face.
Stage one uses the adapter cone to fold the tubing wall outward at 90 degrees, creating a shallow bell shape. Stage two replaces the adapter with the finishing cone, which rolls the bell back down against itself to form the final double-wall flare seat. This two-layer construction prevents the tubing from pulling through the fitting under hydraulic pressure and creates a leak-proof seal when torqued to spec.
Tube cutting and bending best practices
Clean, perpendicular cuts are non-negotiable for leak-free flares. The integrated rotary cutter in the 24364 kit scores the tubing wall as you rotate the tool around the line, producing a square cut without the burrs or deformation common with hacksaw or abrasive-wheel cuts. Replace the cutting wheel after approximately 50 cuts or whenever you feel increased resistance.
Bending without kinking
The spring-loaded bending tool slides over the tubing and supports the walls during the bend. For 90-degree bends, mark your desired bend center point, position the tool’s pivot pin at that mark, and apply steady pressure while walking the tool around the radius. Rushed bends or undersized bending tools collapse the tubing wall and restrict brake fluid flow. We recommend a minimum bend radius of 2 inches for 3/16-inch line and 2.5 inches for 1/4-inch line.
Material compatibility and tubing preparation
This flaring tool is engineered for cold-rolled steel brake line — the industry standard for over 95% of domestic and import vehicles. Steel’s ductility allows the metal to flow and fold during the flaring process without fracturing. The 24364 will not work with stainless steel, aluminum, or copper-nickel (Cunifer) tubing; those alloys require different flaring pressures and cone angles.
Before flaring, inspect the tubing for rust scale, paint overspray, or corrosion inside the bore. Even microscopic debris prevents proper flare formation and contaminates the hydraulic system. Run a nylon brake line brush through the tubing interior and wipe the exterior with a clean shop towel. Never use petroleum-based solvents; residual oil will contaminate brake fluid and cause seal failure.
More brake service and chassis tools from OEM


What people are saying

Double flaring tool questions answered
No, this tool is designed exclusively for cold-rolled steel brake tubing. Stainless steel requires significantly higher forming pressure and different flaring cone angles than the 24364 provides. Attempting to flare stainless with this tool will either crack the tubing or damage the dies.
If you’re working with stainless or copper-nickel brake lines, you’ll need a hydraulic flaring press specifically rated for those alloys. Standard steel brake line remains the OEM specification for the vast majority of vehicles and meets all DOT safety requirements when properly installed.
A double flare folds the tubing wall back on itself to create a two-layer sealing surface with a 45-degree taper. This is the standard for most domestic vehicles and many Asian imports. A bubble flare (also called an ISO flare or inverted flare) mushrooms the tubing end outward into a bulbous shape without folding it back.
Bubble flares are common on European vehicles and some Japanese models. The 24364 kit includes adapters for both styles. Check your vehicle’s brake fitting — if the fitting nut has a cone-shaped seat inside, you need a double flare; if the seat is flat or concave, you need a bubble flare.
Exactly 3/8 inch of tubing must protrude above the die face for proper double flare formation. The 24364’s click-stop adjuster sets this height automatically — tighten the clamp screws until you hear and feel the click, then stop.
Too much protrusion creates an oversized flare that won’t fit into the brake fitting. Too little leaves insufficient material to form the complete double wall, resulting in a weak flare that can pull through under hydraulic pressure. The click-stop feature eliminates measuring and ensures consistent results across multiple flares.
No, never use lubricant on brake tubing before flaring. Any oil, grease, or cutting fluid residue will contaminate the brake hydraulic system and cause rubber seals to swell and fail. The steel brake line material is soft enough to form without lubrication when using properly designed dies.
The only preparation required is deburring the cut edges with a small file and wiping the tubing clean with a lint-free cloth. If you’re struggling to form the flare, the issue is either corroded tubing that should be replaced or incorrect die size for your tubing diameter.
It depends on why the flare is leaking. If the leak is caused by a scratched sealing surface or debris under the flare, you can cut off the old flare, prepare a fresh section of tubing, and create a new flare an inch or so farther down the line.
However, if the original flare failed due to cracks, tubing corrosion, or pull-through, the entire section of brake line should be replaced rather than patched. Work-hardened or damaged tubing near the old flare will likely fail again even with a fresh flare. When in doubt, replace the full line — the cost of new tubing is trivial compared to the safety risk of a brake system failure.
The 24364 kit includes dies for 3/16-inch and 1/4-inch brake line, which covers approximately 95% of passenger vehicles and light trucks. Most domestic cars use 3/16-inch line for all four wheels. Larger vehicles and heavy-duty trucks often use 1/4-inch line for the front brakes or all four corners.
The kit does not include dies for 5/16-inch line, which is occasionally found on medium-duty trucks and vintage vehicles. If you need to work with 5/16-inch line, OEM offers dies as a separate accessory or you can step up to their professional-grade flaring kit that includes all three sizes.
A properly formed double flare will have a smooth, symmetrical cone shape with no cracks, splits, or folds in the metal. The flare should fit snugly into the brake fitting with light finger pressure — if you have to force it or if there’s excessive play, the flare dimensions are wrong.
Visually inspect the inside edge of the flare where the two walls meet. You should see a clean, uniform seam all the way around with no gaps or overlaps. The flare cone angle should match the fitting seat; if the flare rocks or tilts when inserted, either the flare angle is off or you’re using the wrong fitting type for your flare style. When in doubt, test-fit the flare in the coupling before cutting the tubing to final length.